

These two weeks were focused on adding a system for placing roads. Eventhough we didnt want the movement of the units be limited to the grid system, we still wanted the roads to snap to it. We plan to later set a NavMeshModifier with a different weight to the streets and probably change the speed at which the units can travel on those roads, meaning they should prioritise the roads where possible.
Version 0.3
Grid System Changes
Unitys grid package was easy enough to use, but we already came to its limits. It is more or less only meant for getting positions in the grid / cells and doesnt have any further functionality we needed. For placing the roads we needed a way to save the positions of already placed roads and buildings, which would only be possible if we had a seperate component that communicates with the grid (other than changing the code of the grid component… which we didnt want to do).
Instead of creating a additional component, we decided to use a custom grid component that would give us the possibility to save information about the cells like which building / road is occupying them.
You can find the custom grid component on GitHub:
https://github.com/lordjesus/Packt-Introduction-to-graph-algorithms-for-game-developers
The grid now consists of a two dimensional array of CellType, which corresponds to either a structure or a road. This makes it possible to find neighbouring cells and check what CellType those are, which we will use to adjust the model of the road to reflect it being a corner, intersection or three way etc:
public class Grid
{
	private CellType[,] _grid;
	private int _width;
	public int Width { get { return _width; } }
	private int _height;
	public int Height { get { return _height; } }

	private List<Point> _roadList = new List<Point>();
	private List<Point> _specialStructure = new List<Point>();

	public Grid(int width, int height)
	{
		_width = width;
		_height = height;
		_grid = new CellType[width, height];
	}
...
Road System
Deciding for a style
We checked out a few methods for creating a road. There is a pretty good github repo called RoadArchitect by FritzsHero, which is very powerfull. We first tried this, as the mesh generation for the roads seemed very promising, but we very quickly realized that this would be overkill for our graphical and gameplay style we had in mind for this project. This package would be perfect for some kind of racing game where the tracks/roads are already predefined before playing the game, though is not really meant for our grid based placement of roads during gameplay.
So we decided on a simpler method in placing objects on the grid just like we did with the buildings. Advantage of this would be that we could use different kinds of roads (dirt, brick, asphalt) depending on the unlocked tech the player has and we could change the visual model more easily.
Placing the road
The road itself is considered a type of building behind the scenes. This makes it easy for us to place it through a button on the UI without having to worry about any special interactions. Roads also have to obide to collision checks and maximum distance from the base anyway.
However as we wanted to later also have roads that show some kind of direction (not just a dirt path), we needed some way of changing the model of the road object. Following the playlist for a city builder from Sunny Valley Studios once again we implemented the RoadFixer class, which would get a position on the grid and change the model of the road at that point, depending on the surrounding neighbours:
public void FixRoadAtPosition(PlacementSystem placementSystem, Vector3Int temporaryPosition)
{
	var result = placementSystem.GetNeighbourTypesFor(temporaryPosition);
	int roadCount = 0;
	roadCount = result.Where(x => x == CellType.Road).Count();

	if(roadCount == 0 || roadCount == 1)
	{
		CreateDeadEnd(placementSystem, result, temporaryPosition);
	}
	else if(roadCount == 2)
	{
		if(CreateStraightRoad(placementSystem, result, temporaryPosition))
		{
			return;
		}

		CreateCorner(placementSystem, result, temporaryPosition);
	}
	else if(roadCount == 3)
	{
		Create3Way(placementSystem, result, temporaryPosition);
	}
	else
	{
		Create4Way(placementSystem, result, temporaryPosition);
	}
}
//[left, up, right, down]
private bool CreateStraightRoad(PlacementSystem placementSystem, CellType[] result, Vector3Int temporaryPosition)
{
if(result[0] == CellType.Road && result[2] == CellType.Road)
{
placementSystem.ModifyStructureModel(temporaryPosition, roadStraight, Quaternion.identity, RoadType.Straight);
return true;
}
else if(result[1] == CellType.Road && result[3] == CellType.Road)
{
placementSystem.ModifyStructureModel(temporaryPosition, roadStraight, Quaternion.Euler(0, 90, 0), RoadType.Straight);
return true;
}
return false;
}The ModifyStructureModel function will just delete the current model and replace it with the correct one. This RoadFixer will be used many time while placing a new road to show the player how the newly placed road will change the already existing ones:
When the road is placed, the corresponding coordinates for each part are saved to the placement grid, to make sure other roads and buildings know those cells are already taken and cant be build on and to change the model of existing road.
Changes in the models of the road and the taken cells are also synched to the other clients on the server, so they also see all the nice interactions of the roads.
The buildings also need to be added to that grid, so the roads can go around them when being placed. This meant we had to add a building size to the building component which will tell the grid how many cells are occupied by it, making new roads “slither” around them:
Visual Upgrades
Starting to change a few textures on the buildings, made it feel a little less “placeholder” like (eventhough many buildings still are).
We also already started to try out the usage of shaders for the water around our test island. Skiddoh did a great job in researching and testing different options for this, settling on a style that fits our view very well and is adjustable to our needs:
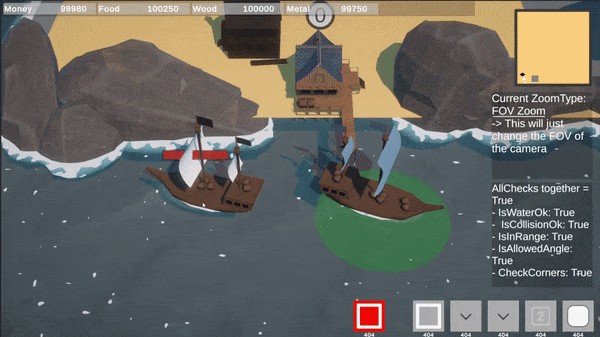
In this clip we can see the interaction of the water with the rocks and also the interaction of the ship with the water, leaving behind a trail and making the pushed water in the front of the ship visible. Looking more closely to the flags and saild of the ships, you can also see that we have added some movement into them so they are not that static, also using a shader.
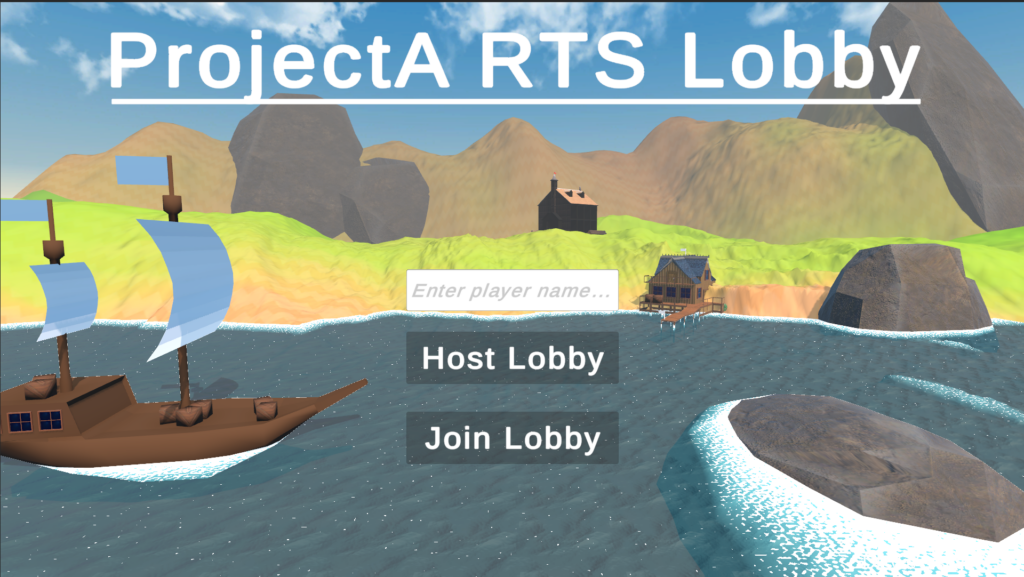
Finishing the visual upgrade section is the new start menu, now showing a nice view of an island:
Player Names
Also added in this version is a little input field for the player name, which needs you to enter one that is at least 3 characters long. In the later versions this will be autofilled with the steam name of that player. We will probably leave the choice to the player if they want to change their name in this game, without having to change their steam name. As the steam connectivity is deactivated for easier testing right now, we have to enter one by hand.
DUDE THIS LOOKS SICK, but do the ships shoot???? NO???? next idea, you’re welcome